|
By Graham K. Rogers

There have been a number of changes to OS X 10.9, Mavericks. Some have been significant. System Preferences have seen several changes. Network preferences provides ways to set up and control the way links to wifi and other connection types are made. OS X itself has seen changes to the ways this is done and the panel has been changed slightly in terms of connection types.
The Network preference panel displays two sections when opened: connections for a particular Location and details of connections. There is a Location button at the top.
With Macs and OS X, the default location is "Automatic", but those who use a computer in a number of places - home, office, hotels - may want specific settings for each. This is strongly suggested. Settings change depending on the connection being used and there is no one-size-fits-all.
The Location button at the top of the Network preferences panel has the locations list plus "Edit Locations". That section allows users to remove, rename or duplicate a location set or to add a new Location. This is especially useful, for example, for those who use home and work connections. These will require different settings. It is easier to change the location than enter new settings each time.
Once created, the new location is activated either by using the Location button or (more easily) by an item in the apple menu (top left of the menu bar). Once these are added, that menu shows locations, plus a link to Network Preferences.
Locations and Connections
Below the location button, are two major parts to the panel. The left side displays any connections for the particular Location. The right side displays details of the highlighted connection.
Each connection type has a colored "light" alongside: either red (off), green (connected) or yellow (on but not connected). We see the yellow when WiFi is turned on but not linked to a system, for example; or if an Ethernet cable is connected but the router has not allocated an IP number.
The bottom of the panel has three small icons: + (Add), - (Remove) and a gear-wheel for changes to be made. When any changes are made to this or any other setting, the "Apply" button on the main Network Preferences panel becomes active and must be pressed before changes take effect.
The + icon allows a user to create a new service. A text box is available for a service name. Service option types are Bluetooth PAN, Wifi, Firewire, Ethernet, Bluetooth DUN (Dial-up networking). Below a dividing line in the Service types panel are three other types VPN (virtual private network), PPPoE (Point to point protocol over Ethernet) and 6 to 4 - a transition method for migrating from IPv4 to IPv6. It is advisable to check with the service provider or a system administrator if users are unsure of which method to use.
On some newer computers there is also a Thunderbolt networking option. For information on this, the article by Iljitsch van Beijnum in Ars Technica may provide some useful information.
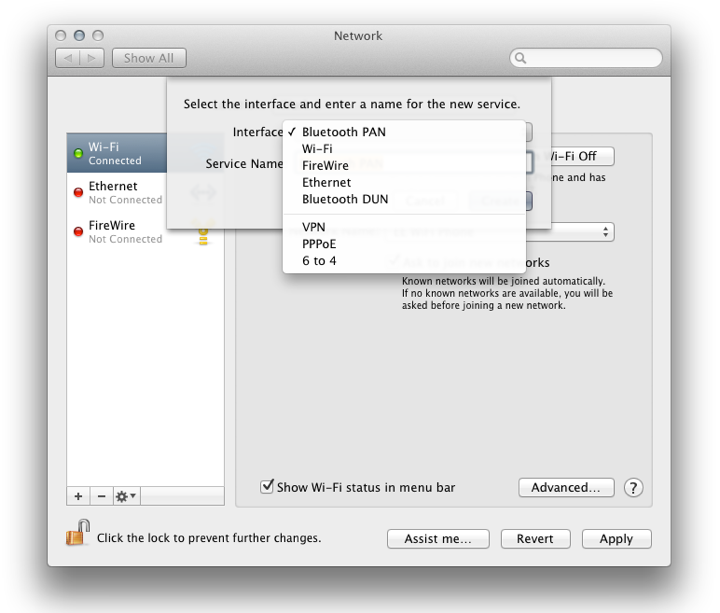
Once a connection method is selected, a name is typed in the box below and the Create button pressed. There is also a button marked Cancel.
The - icon will remove a service that is highlighted: immediately and with no warning. Fortunately, the Revert button beneath the main panel will restore the setting.
The gearwheel icon has several useful functions:
- Duplicate Service - the service settings are copied when a new name for the service is typed in the text box provided;
- Rename Service - the connection may be given a new name by using the text box provided;
- Make Service inactive - The connection type is listed as inactive in the main panel. The gearwheel menu item changes to Make Service Active, so this may easily be changed back;
- Set Service Order. A small panel appears and the services are listed. They may be dragged into the user-preferred order (e.g. Wi-Fi above Ethernet);
Import Configurations opens a Finder menu and users may select from a file that has the required data. This may be useful when connecting to corporate networks;
Export Configurations has always been greyed out on all the connection types shown on my computers;
- Manage Virtual Interfaces - this opens a panel in which any such interfaces would be listed. There are three icons: +, - and a pencil icon which is for editing a list item when highlighted. Pressing + allows a user to select from a new VLAN - Virtual Local Area Network, or New Link Aggregate (use of multiple Ethernet ports together). These are aimed at corporate network connections and are not usually available to home users.
As with other significant changes to the system, it is unwise to tamper with Network settings if you are not sure.
Status Panel
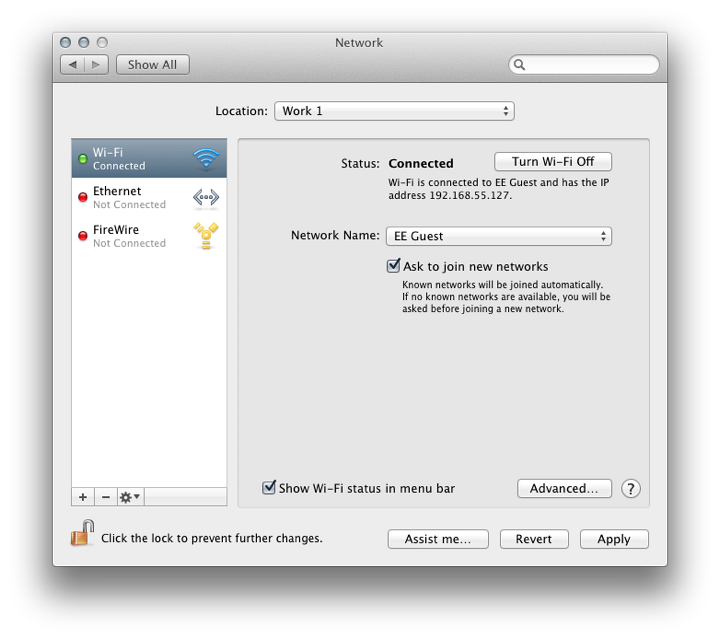
The information displayed in the larger panel, to the right of the connection lists, depends on the selected connection. At the top is the "Status" of the service (e.g. Connected, Not Connected, Cable unplugged).
A short description of the service is below and displays the method of configuration (which can be changed) and basic details of the connection, such as IP numbers.
To the right of the WiFi Status display is a button marked Turn Wi-Fi Off (or Turn Wi-Fi On). In versions of OS X before 10.8 this used the proprietary term, "Airport". Apple now refers to Wi-Fi.
With the Wi-Fi connection, a button shows the Network Name. A menu revealed by the button shows a menu with a list of detected Wi-Fi networks. At the bottom are: "Join Other Network" and "Create Network," which creates a computer-to-computer link (sometimes referred to as an ad hoc network).
What is displayed below will depend on the type of service highlighted (not necessarily the one in use).
A checkbox offers a user the option to be informed when connecting to a new network. If checked, known networks will be joined automatically otherwise a user will be asked.
Near the bottom of the panel is a checkbox that allows the Wi-Fi status to be displayed in the menu bar. This gives quick access to a list of available networks as well as providing other menu items: Turn Wi-Fi Off, Join Other Network, Create Network, and Open Network Preferences.
To the right of the checkbox is a button marked, "Advanced."
Advanced
Editing changes to a service may be made by pressing the lower button marked, "Advanced". This reveals a multi-section panel with detailed information concerning Wi-Fi, TCP/IP, DNS, WINS (Windows Internet Naming Service), 802.1X (for authentication), Proxies and Hardware.
-
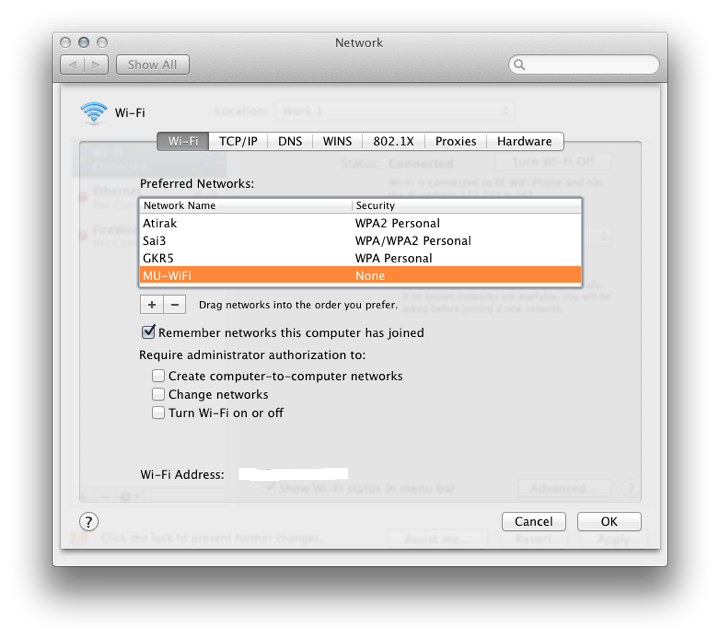
Wi-Fi is only shown in the Advanced panel when this is the service highlighted in the main panel. It displays a list of preferred networks or networks that the computer has connected to. As users connect to different Wi-Fi routers (at hotels for example) or other places where the internet is accessed, the list will grow.
If the user's home network is not at the top (click and drag), the system will search through all others before making a connection. This will take time and may delay (or prevent) proper access. There are + and - icons below the list to add or remove networks. It is useful (particularly for those who travel) to cull the list occasionally.
A checkbox below, "Remember networks this computer has joined", is useful in that a speedier connection may be created when using a regular link, but (see above) there is a negative side to this. A series of checkboxes below will make it necessary to have Administrator authorization to:
- Create computer to computer networks (see also, Sharing for setting up such ad hoc links);
- Change networks;
- Turn Wi-Fi on or off.
At the bottom of this panel is a display of the Wi-Fi Address (also called the MAC number - see Hardware, below). A button marked OK accepts any changes. There is also a Cancel button.
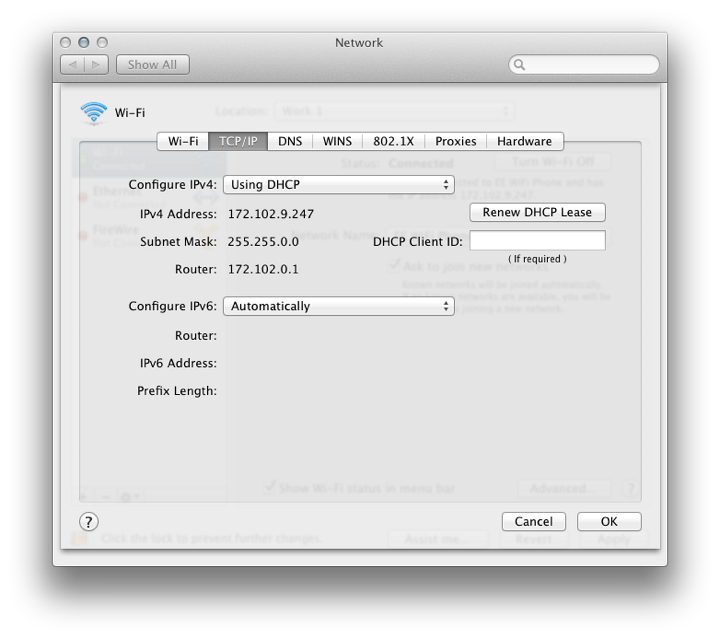
- TCP/IP (Transfer Control Protocol/Internet Protocol) is used to connect a computer to the internet. A number (IP number) is allocated to the specific connection by the router. In most cases we use DHCP, a dynamic (automatic) allocation. In some cases, we may want to specify the IP number and a button at the top of the panel allows four methods to allocate IP numbers: Using DHCP (dynamic), Using DHCP with manual address, Using BootP (an older protocol), Manually and Off.
Users should not change these settings if they are not aware of the possibilities, or are not acting under advice of someone who is. Below the button is a display of the current IPv4 Address and router settings. A button further down is for the way IPv6 (a newer type of IP recognition, now more widely used) is configured. The default setting is Automatically. We may also select from Manually and Link-local only (for use in LAN connections). If IPv6 is connected, the settings are displayed below the button, similar to those for IPv4 (although the number displays are different - e.g. FE80:0000:0000:0000:0202:B3FF [source: SAS])
- DNS is used to help identify a website name. Machines only work with numbers. A URL is converted to an IP number by a server. The numbers for DNS Servers may be assigned automatically by the router or added by the user using the + button below. This now indicates either IPv4 or IPv6 addresses may be entered. The service provider should have settings available for users. There are other numbers that may be suggested, including OpenDNS.
Depending on the carrier, some DNS numbers may be more or less effective. In the DNS pane, the left panel lists any DNS server numbers entered. The right panel is for search domains that a user wishes to include. Clicking the + icon reveals a text box in which either an IP number or a domain name may be entered. These are servers on the internet that direct DNS searches (not Google searches).
- WINS (Windows Internet Naming Service) is used for support of NetBIOS over the internet and assists when connecting to remote networks that use NetBIOS Names. Microsoft Technet has an explanation of this online and lists several benefits. New Macs may have a NetBIOS name added automatically to the panel, with a generic Workgroup name of "WorkGroup". These may be edited. A list of WINS servers may be expanded with the use of the + icon at the bottom of the panel.
- 802.1X is a standard for access control to enhance security. Users may add a profile to the panel and details of any profiles used will be shown in the right side of this pane. A system administrator will advise of the need for this.
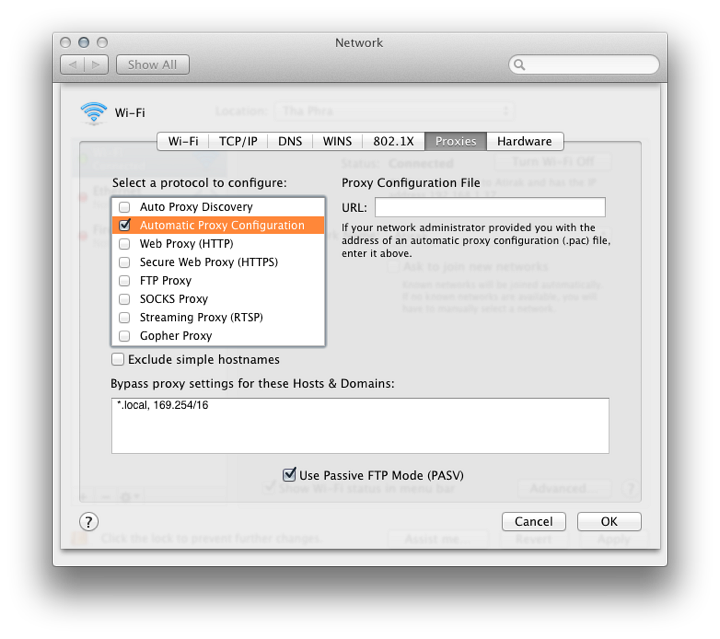
- Proxies (or proxy settings) are a way for a system administrator to protect the network by filtering all requests for internet access. Home users do not usually need to worry about these. A system that has proxy settings should provide the details to authorized users.
Some settings will require authorization to ensure that the connection is being made by a user with a legitimate reason to access via the service. Highlighting (or checking) items in the list reveals text boxes to the right in which a user may enter relevant information. Details may include a URL and a specific port number (like 8080).
A checkbox is also available should a service provider require password authentication for specific services and when checked these details may be entered in the boxes provided.
A checkbox at the bottom of the panel for Passive mode FTP connections is used to determine how connections are established. Depending on the FTP application (if used) this box would normally be checked.
- Hardware was a new panel with OS X 10.7, Lion. There are three items: MAC Address, Configure and MTU.
- MAC Address is a network identifier specific to the computer (or other device) and is shown automatically;
- Configure has a button with the default setting of Automatically. Manually is also available;
- MTU or maximum transmission unit is a setting concerned with the largest protocol data unit or (internet) packet size. When Configure is set to Automatically, this is greyed out and shows Standard (1500). When Configure is set to Manually, users have an MTU choice of Standard or Custom.
The usual health warning applies here.
If settings in the Advanced panel are changed we need to click OK to accept and return to the main panel. To have the changes take effect we then press the Apply button at the bottom of the main panel. Two other buttons are available, Revert, and Assist Me. Revert (as this implies) should remove the last change.
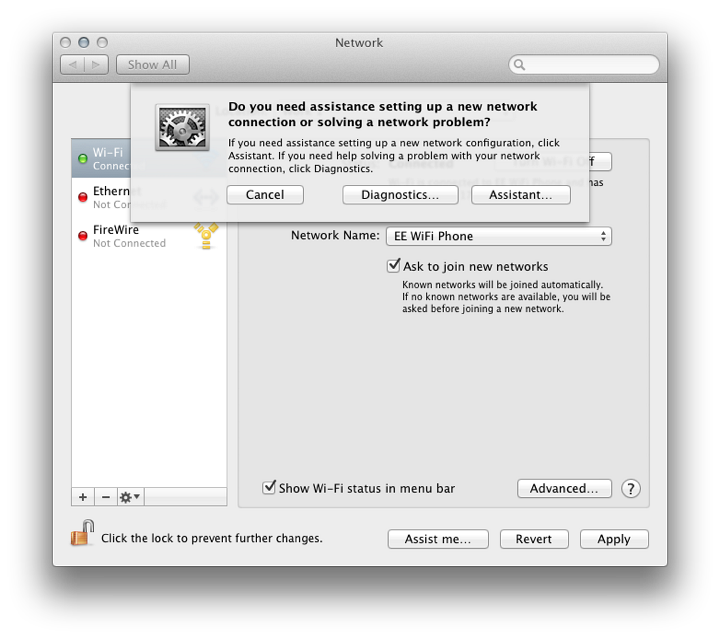
Assistance
Assist Me provides help in two ways: for diagnosis of a network that is not behaving itself; or for those setting up a network from new.
- Pressing Diagnostics starts the Network Diagnostics utility which runs through a series of checks, making suggestions to the user as the check progresses;
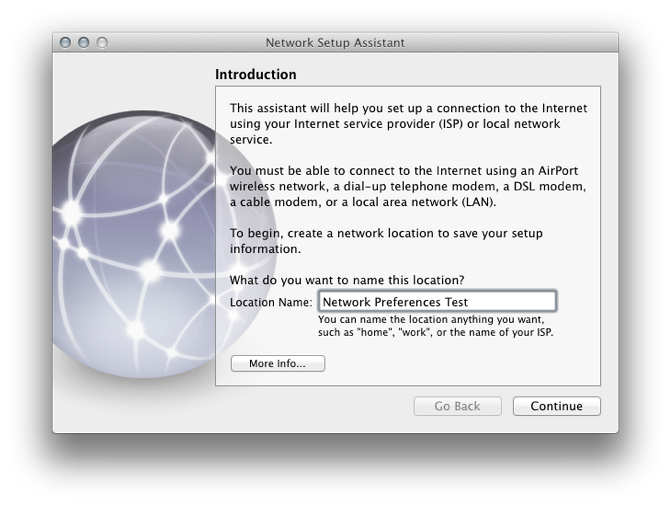
- Selecting Assistant opens a utility called Network Setup Assistant. The main panel explains the purpose and invites the user to begin the process by giving the new network a name.
Notes
Network preferences is one of the most dangerous of the entire collection of System Preferences, not because there is anything inherently risky about the data that is used but that there is the potential for problems. A simple rule applies: if you don't know, don't touch; or alternatively, If it ain't broke, don't fix it.
An online article by Topher Kessler provides a useful commentary on the ways that the update to use of SMB connections may be used, as well as some ideas on troubleshooting.
See Also:
Graham K. Rogers teaches at the Faculty of Engineering, Mahidol University in Thailand where he is also Assistant Dean. He wrote in the Bangkok Post, Database supplement on IT subjects. For the last seven years of Database he wrote a column on Apple and Macs.
|
|