eXtensions
|
Creating a Podcast (Part One: Sound Input) |
Many people think you need an iPod to listen to a podcast. This is not so: any device capable of handing the files (m4a, mp3, mov, mp4 or pdf) will do.
Doc Searls is credited with coining the term when he wrote, "I'll create an acronym for it: Personal Option Digital 'casting".For music, I subscribe to C.C. Chapman's excellent Accident Hash and to KCRW Music Exchange. For technology I take a feed produced by WGBH in Boston, the BBC and Public Radio International (PRI). I decided to make a podcast when listening not to music but to tips on digital photography from Tźbingen in Germany, while on a 79 bus in darkest Thonburi.
I am not about to reinvent the wheel. For the technical details on making podcasts, try Phillip Torrone's O'Reilly page; or Google.
For me podcasts have three elements: information, sound and distribution. The eXtensions column alone is inadequate. News links provide some information; I have local sources; Apple forums are fertile; and some people contact me directly. I found myself thinking in three media: text, html and sound. Material needs adaptation for each.
I deliberately keep it simple, so create the podcast on my PowerBook. With Garageband, I record my voice and save some clips for inclusion in future programs. I could, of course, use other sound-recordng software I have, such as Sound Studio. I can also edit the clips in both: necessary when I trip over the words I am saying, or a fast motorcycle passes the house.
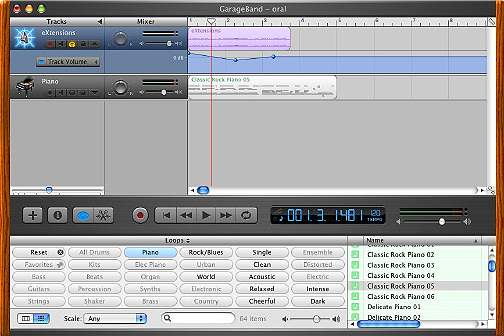
Garageband has a store of pre-recorded, royalty-free loops that allow links -- rather than soundless gaps -- between voice clips and to provide a background when making a transition between two sections. Apple advertises that over 1,000 are included and you can buy more. Loop volume can be adjusted easily.
As with making movies, more is less. I toyed with the idea of guitar or harmonica, but repetition could be too much for some ears. I settled on a simple piano loop: Classic Rock Piano 05. As time goes by, I shall include some others if appropriate. The loop is imported by click and drag. It can be moved to the exact position wanted in the same way. I can also use copy and paste to put more loops in the time-line.
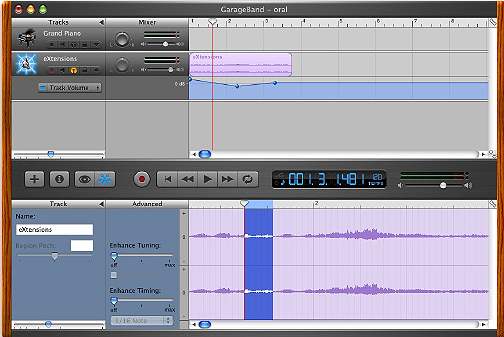
At the left of the GarageBand panel is the list of tracks. The default is Grand Piano (a keyboard also opens on startup) but I deleted this when I added the voice track. In the Track menu I selected "New Track" and, in the panel that opened, clicked on the "Real Instrument" button: bottom of the list is "Vocals". When that is selected a list appears in the opposite column. Select "No Effects."

I found it necessary to slide the volume control along to the right. When I checked the downloaded version (rather than the version I made on the computer), it was clear that the balance was not correct, so I now adjust the L - R dial in the track mixer.
The track panel has some useful controls: to enable or disable recording for a track: to turn the track off (useful if you are still trying to record and have an effect laid down); and to disable other tracks (keeping them out of the way).
A locking icon protects a track from being edited, rendering the track to the disk thus freeing up processing power. GarageBand does cause a fair amount of activity and I was aware that the fan came on occasionally while using this application.
The final control in the panel allows volume adjustments: click on the coloured bar revealed and the entire track can be adjusted. By clicking at places along the track, a small ball shape appears and this can be adjusted up or down, with the track before and after in a gradient giving a gentle rise and fall to volume.
I recorded one paragraph at a time but still had to make cuts. By clicking on the Track Editor, a panel is revealed and an editable version of the track appears. At the bottom left of the panel is an unmarked control that zooms the track, making tiny cuts possible. The material to be cut is highlighted and removed using Cut in the Edit menu. Selection was considerably easier on the eMac with its mouse than when using the trackpad of the PowerBook.
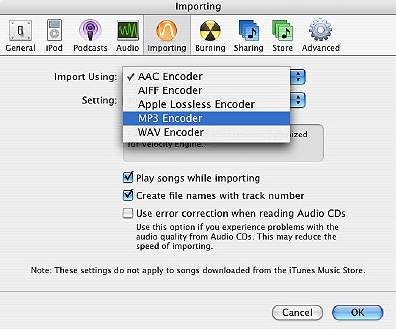
When recording is complete I select "Export to iTunes" in the File menu. In iTunes the file is rather large as it appears as an AIFF file. This needs to be Converted to MP3 (or MP4/AAC) using iTunes' Advanced menu. File type is selected in the preferences panel. From iTunes, the file can be dragged to the desktop and uploaded either to the Internet or to a music player.
See also Part Two: Distribution Media

For further information, e-mail to Graham K. Rogers.
Back to
eXtensions
To
eXtensions: Book Reviews
To
eXtensions: Year One
To
eXtensions: Year Two
Back to homepage