eXtensions - Thursday 15 February 2024
By Graham K. Rogers
![]()
As a friend recently bought a new Mac I have been making suggestions including how to set up a new disk for Time Machine. After replacing batteries in a wireless keyboard, I typed random characters into Photos to see if it was working, only to be shown some old images that included the random characters.
A friend recently picked up a new MacBook Pro and I was full of suggestions, but trying not to overdo things. People offering advice sometimes take over and the user can end up confused. I handed over a spare micro-USB to USB-C cable I had. I find these useful; and I also bought a hybrid (USB-A/USB-C) thumb drive. I thought that an external SSD was a good idea too and he now has a Samsung T7 512GB disk to start with. I try to persuade any new user (and old ones too) to run regular backups. One of the easiest is to use Time Machine as it is already available on macOS installations.
 Time Machine is a system that backs up a user's data to a disk that has been set up for the purpose. When connected, backups will be made regularly until the disk is full, when old backups will be deleted. When the Time Machine backup disk is connected to the computer, it is possible to look back at data on the disk: previous days, weeks and months. It may be used to recover files that were accidentally deleted.
However, the external disk needs to be formatted for Time Machine, and the recommended format is APFS Encrypted. The T7 disks are formatted exFAT. That is Windows and Mac compatible, as far as file storage and transfers are concerned, but is not suitable for Time Machine. I put together some instructions for the new owner, breaking down the information to make it more easy to absorb (hopefully).
If a new disk is used for Time Machine backups, the recommended format is APFS Encrypted. That is probably not the same as the current formatting when it comes out of the box. Some disks (e.g. LaCie) may include a Mac setup application. I prefer wiping the disk and setting it up from new, using Apple's Disk Utility. This is found in Applications in the Utilities Folder. It can also be accessed with a Spotlight search, or through Launchpad (in a Folder marked Other).
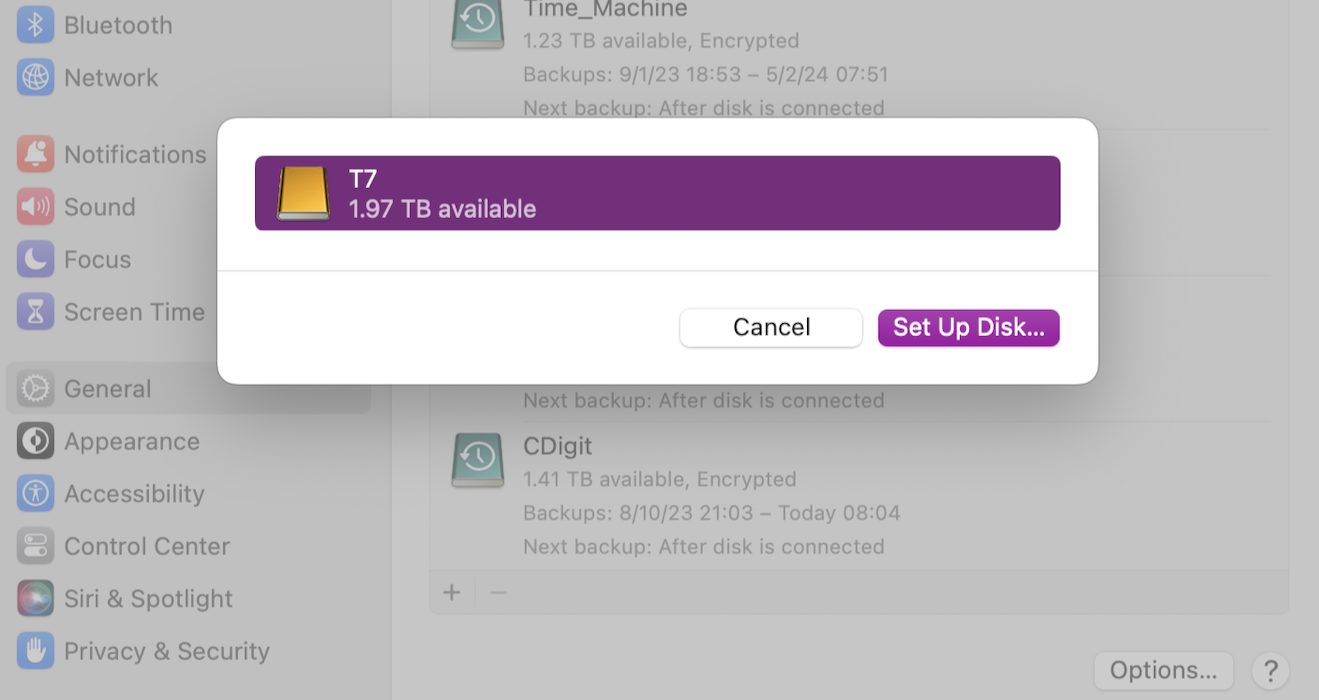
When a new disk or other device is linked to the Mac via a USB port, the user is shown a warning panel and will be asked to give permission for that disk (or device) to be used. Enter the Time Machine panel. Any disks that are already set up for this feature are listed. At the bottom are + and - symbols. If a disk is connected, a panel is shown with disk information and a live button, marked Set Up Disk...
If the disk is already formatted correctly, the process will begin. This may take a while on a disk with a lot of data. With a new computer with little data, less time is taken. If the user is not sure about the disk format status, or there is a warning from the Time Machine set up process, it will be better to run Disk Utility and make sure that the formatting is right for Time Machine. I tried this on the SSD I had bought for the ability to record ProRes videos. As can be seen in the panel above, the 2TB Samsung T7 SSD seems to be ready to go. However, this comes out of the box formatted as exFAT so needs to be set up correctly with APFS Encrypted before it can be used for Time Machine.
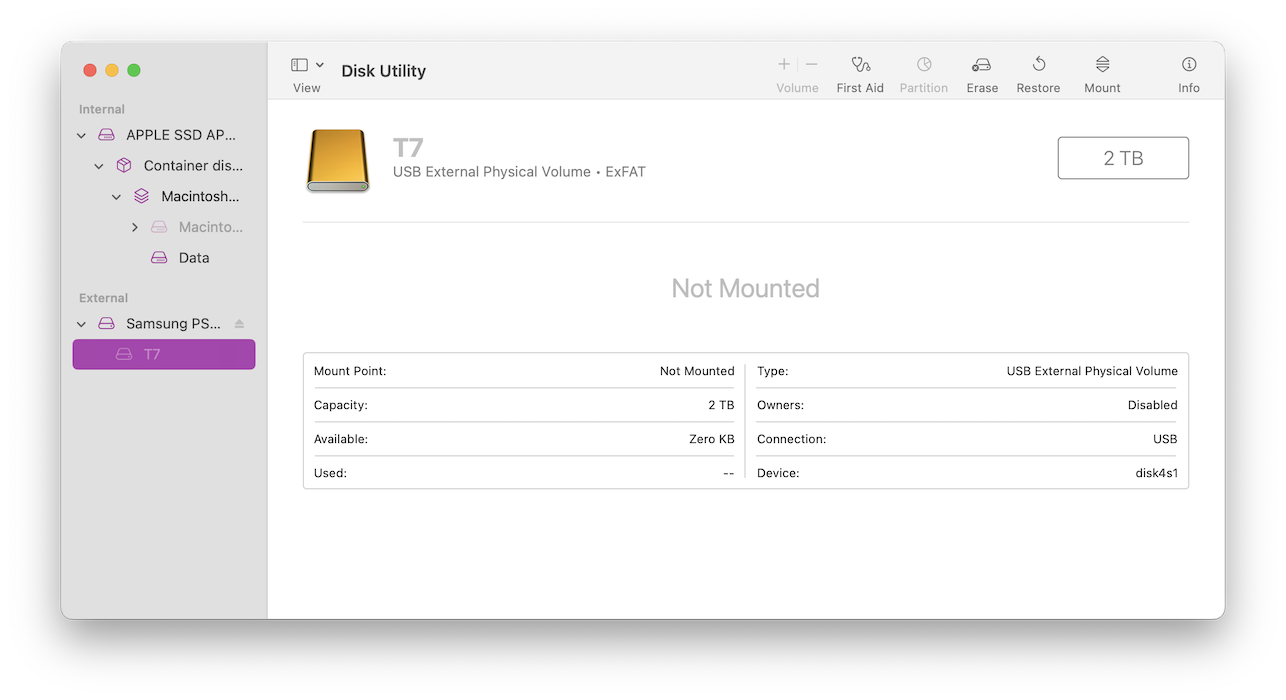
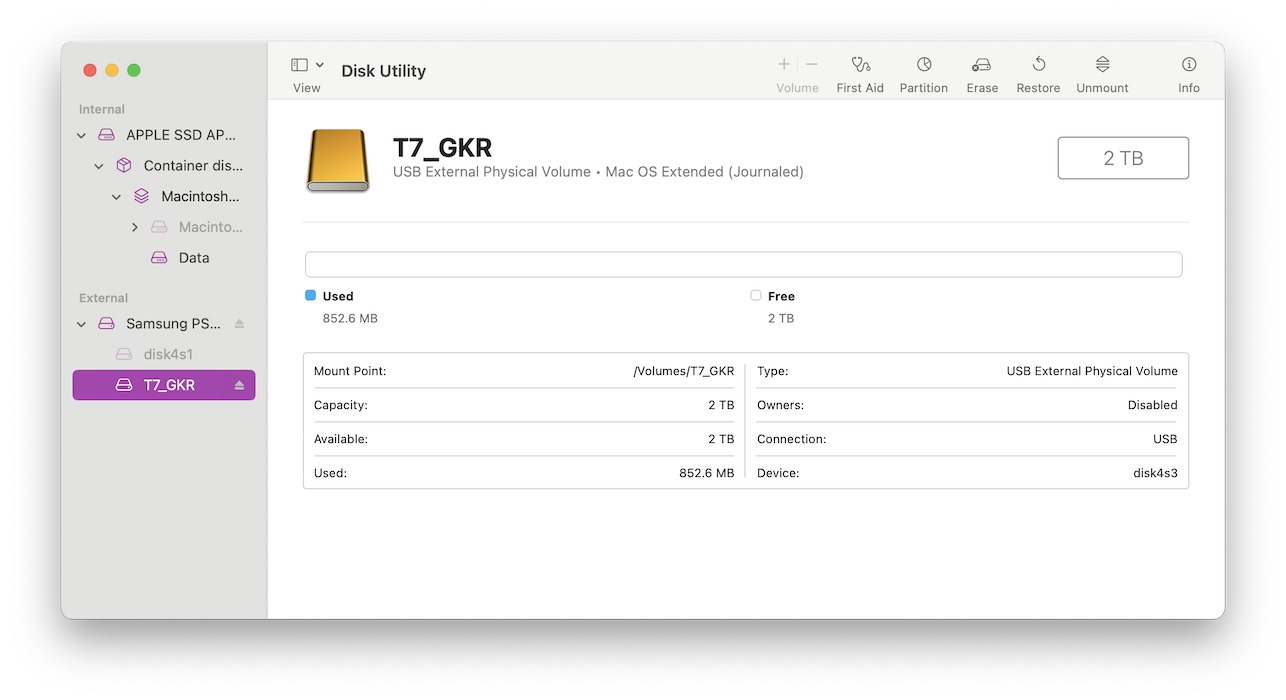
It does not matter if the disk is connected before Disk Utility is started. The application will recognise the disk when it is mounted. It displays the disk icon on the left of the main panel with the physical volume shown below. Because the Samsung T7 has a Master Boot Record it cannot be repartitioned, only erased. I elected to erase the disk rather than the physical volume. I selected the options: macOS extended (journaled) and Apple Boot Record. I also renamed the disk. The Erase process took around a minute or less. The new formatting now allows me to re-Partition if needed. I prefer to be in full control of my hardware.
I returned to the Time Machine panel in System Settings. Clicking on the + option a new panel was made available after Set Up Disk was pressed. This required me to select encryption (On/Off) and warned about forgetting the password selected. This can be entered in the boxes below (Password plus Confirm). There is a warning that the data cannot be restored if the password is not available. Without encryption any backup will be slower in my experience so I recommend this.
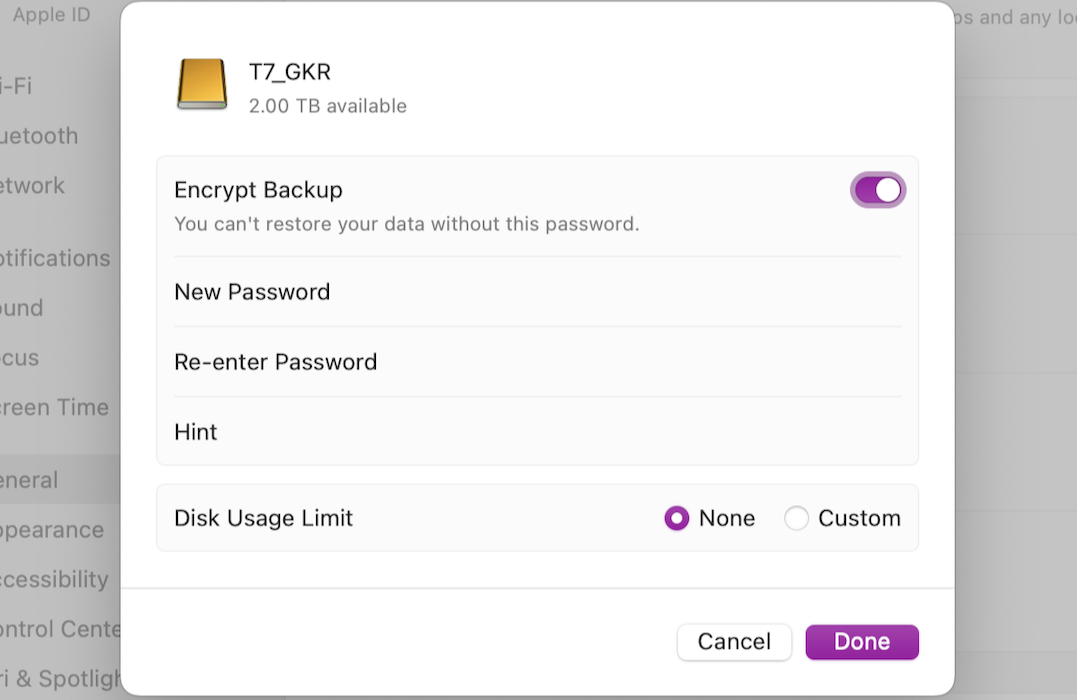
I strongly suggest that the password is written down and locked away somewhere safe, in at least two locations. There is not much point keeping it on the computer if data is inaccessible or lost; and in the case of a disaster (fire, earthquake, flood) other devices may also be unusable.
When the Time Machine process begins, the first backup will take a long time, even with SSD. Subsequent backups will take far less time. These are done hourly, but there is a menu item that can be accessed that allows the user to Back Up Now. Sometimes that menu item is not shown. I covered this in October, in an item on Time Machine backup problems
I am still surprised by the abilities Apple includes in its software. It has long been known that it is possible to identify (and copy) text included in images in Photos. That copying includes Thai which I have found useful. Not that the software is up to translating the text, but it is easy enough to copy and paste into Google translate so that a general idea of the content is available. While I often search for images using keywords, the search may occasionally bring up some text within the image.
This week I replaced the batteries on the Apple keyboard I use with the Mac mini in my office. It had been nagging me for a week or two, but there was still enough in the batteries to delay the change (the batteries were on the desk ready). This week, with the power level showing 6%, I thought it was about time to make the switch, so reached for a 1 baht coin I keep handy to unscrew the top of the battery chamber. Old batteries out, new batteries in, press the pairing button: done. The batteries were properly disposed of at the Faculty of Engineering, Mahidol University. To make sure that the keyboard had connected properly, I typed a couple of random characters (gg) into the Photos search panel as the app was open at the time.
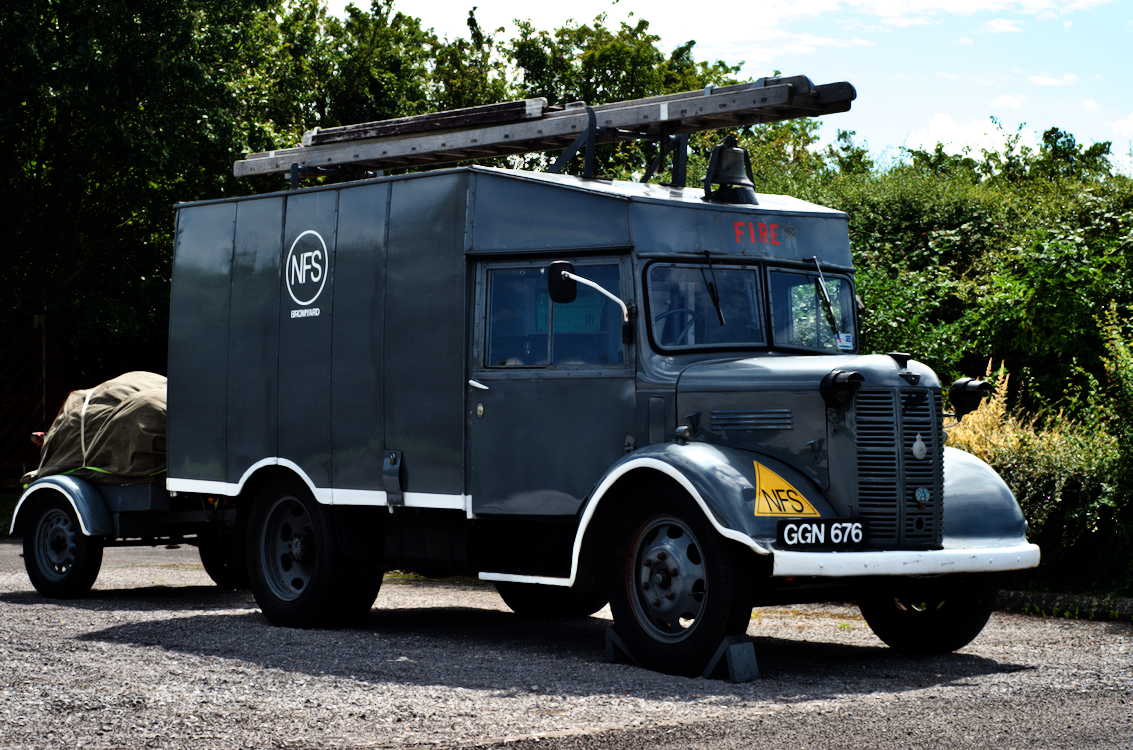
Several images of an old truck that I had taken at Quainton Station on the old extension of the Metropolitan Line appeared onscreen. I was unsure why these were offered, so put the images full screen, only to find that the registration number of the truck had been indexed: GGN 676. I checked Photos on the iPad Pro starting with the search for GG, and that produced the same results. As a further check, I typed in the characters NFS which can be seen on the vehicle. That brought up the photos as well. It is all in the details.
Graham K. Rogers teaches at the Faculty of Engineering, Mahidol University in Thailand. He wrote in the Bangkok Post, Database supplement on IT subjects. For the last seven years of Database he wrote a column on Apple and Macs. After 3 years writing a column in the Life supplement, he is now no longer associated with the Bangkok Post. He can be followed on Twitter (@extensions_th)

For further information, e-mail to
Back to
eXtensions
Back to
Home Page