eXtensions - Tuesday 22 October 2024
By Graham K. Rogers
![]()
Helping a friend to prepare for a presentation in English, I looked at how I had saved text to an audio file in iTunes in 2009. With the new platforms of iOS and iPadOS saving text to audio different and the output is not the same. the choice of method and platform depends on how the user wants to use the final audio file.
 A Thai friend was having trouble memorizing English text for a presentation. My own students here rely on memory instead of knowing the information they need to present. If students are interrupted in mid-flow, they have a problem returning to the point in the content they were at. When Apple presenters prepare, they already know the technology or product, but rehearse over and over, something students may not have time for. A particular student who was presenting in a 9am class did not do a good job. When questioned, he admitted that he had only finished at 8am: late start, all night working, no time for rehearsal. And low marks.
Contrast this with someone like Craig Federighi who knows and understands his presentation so well that he can afford to go off script and still provide all the information needed; or the late Steve Jobs whose 2007 iPhone introduction, near the end of a mammoth presentation, had been rehearsed over and over for some 30 days in a theater.
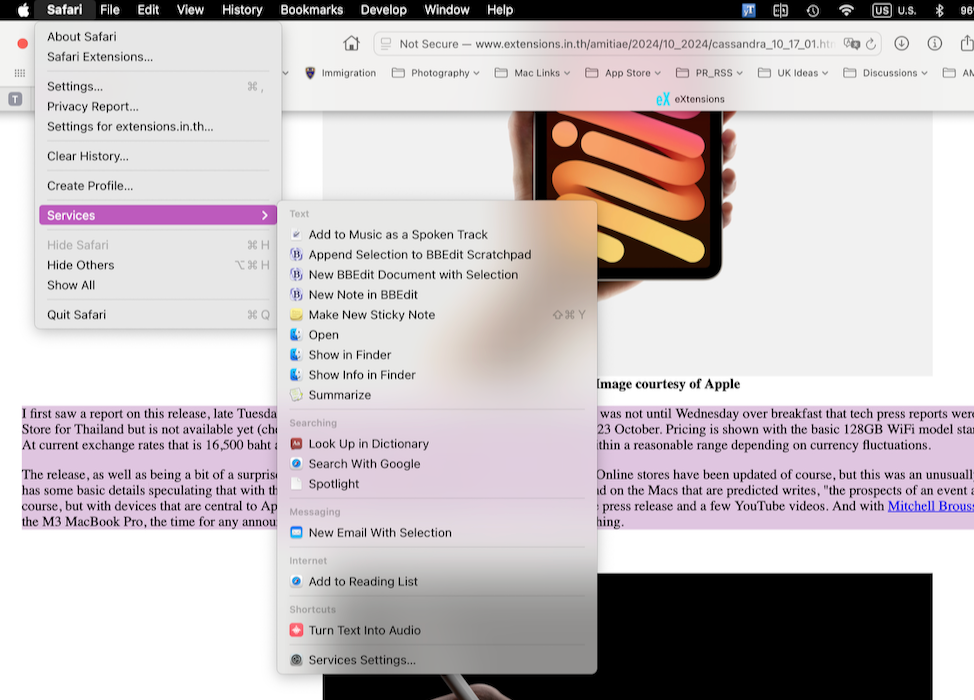
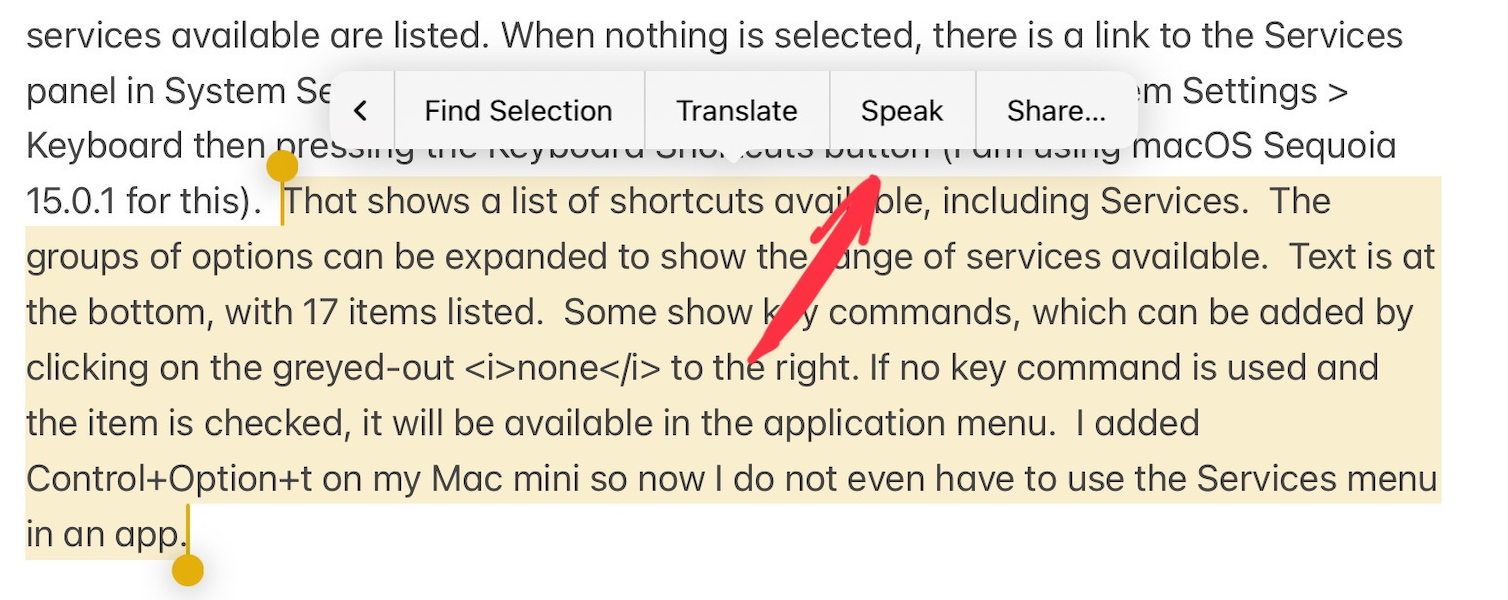
If a Services action is available in any app, it can be accessed through the application menu (e.g., in Safari, the Safari menu). When text is selected, for example, any services available are listed. When nothing is selected, there is a link to the Services panel in System Settings. That can also be accessed through System Settings > Keyboard then pressing the Keyboard Shortcuts button (I am using macOS Sequoia 15.0.1 for this). That shows a list of shortcuts available, including Services.
The groups of options can be expanded to show the range of services available. Text is at the bottom, with 17 items listed. Some show key commands, which can be added by clicking on the greyed-out none to the right. If no key command is used and the item is checked, it will be available in the application menu. I added Control+Option+t on my Mac mini so now I do not even have to use the Services menu in an app.
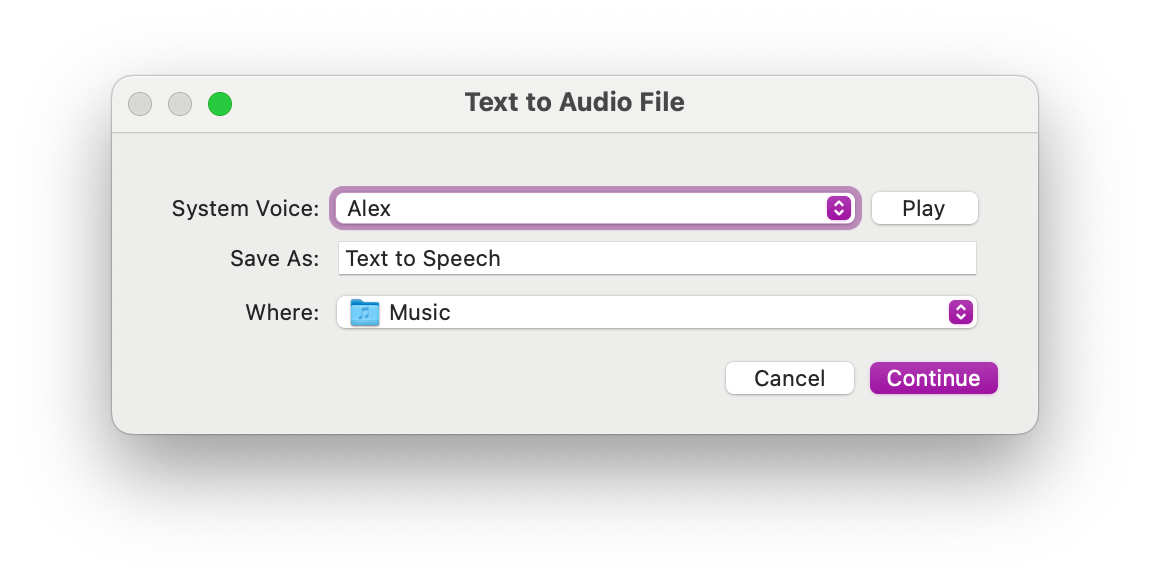
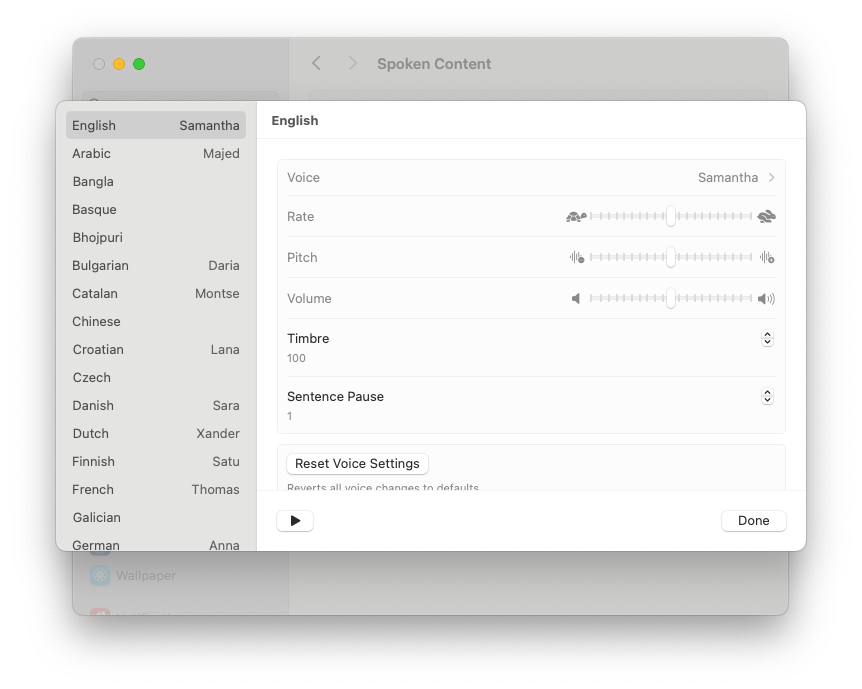
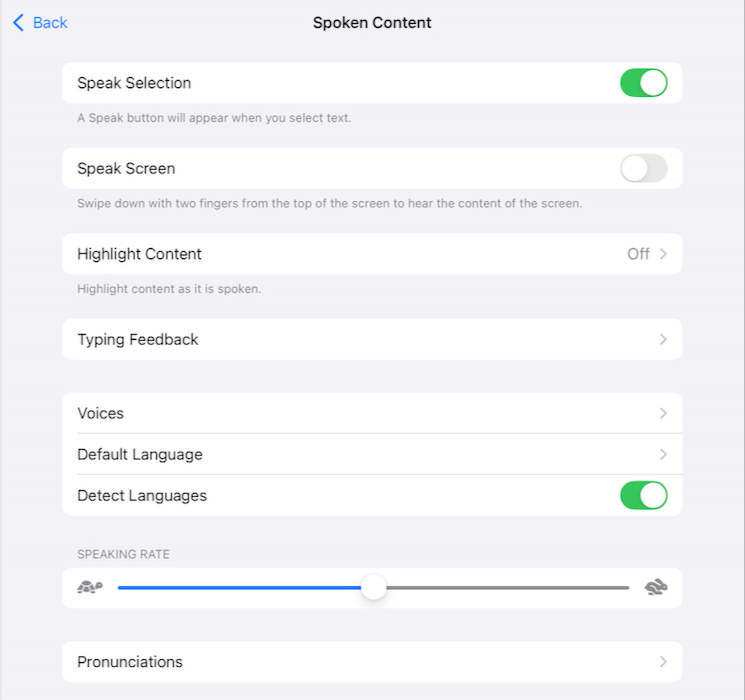
Activating the Services item (menu or key command) reveals a small panel with the Voice option, a file name which can be edited, and the location of the saved file. With the Music folder, that file appears in iTunes on the Mac and is then synchronized to my other devices. The file could be saved to another folder and sent to other users. While the default Voice can be changed in that panel, the speed cannot. That is in System Settings > Accessibility > Spoken Content, and should be set up first. The Information icon (i) alongside the voice selector reveals a panel where the speed (and other settings) can be changed. Particularly for non-native speakers, I suggest that the speed is reduced.
However this does need to be turned on first in Settings > Accessibility. In the first group, Vision, there is a section marked, Spoken Content. The top button is Speak Selection. This turns on a feature that is available when text is highlighted. It adds Speak to the tools like Cut, Copy, Paste, Replace et al. The sound uses the system voice (at the speed already selected), starting immediately with no panel (as above). It stops only when it comes to the end, although hiding the app will also end the sound delivery. This is a quick and dirty method that does not save the output as a file, but will be useful in some situations.
A more permanent way is to use a shortcut. I must admit that while I have been able to use AppleScript in the past, I had less success with Automator on the Mac as the tools available to me never did what I wanted. I tried to set this workflow up on the Mac using Automator (copy text, save file to iTunes) but was not successful.
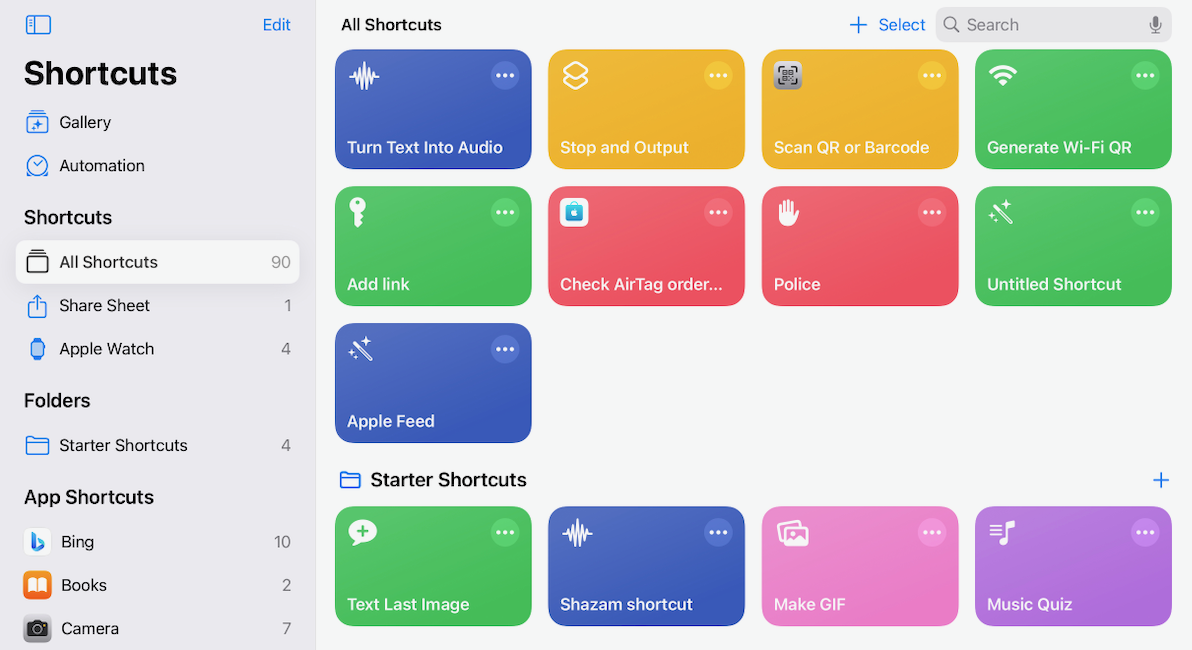
After some searching (this did not appear immediately) I found almost what I wanted in Shortcuts: Turn Text into Audio. Now that I have used it, this appears in the All Shortcuts section at the top. As it stands, the shortcut offers the user a panel to accept text. It will take the full text from this page, but I have not experimented with longer examples. On the Mac, my original presentation (see above) was 30 minutes. When the text is pasted into the panel, pressing the Done button creates a sound file that appears on the screen, which can then be saved or otherwise shared. I saved the output to the Desktop in iCloud as this makes the file available on the Mac and all my devices.
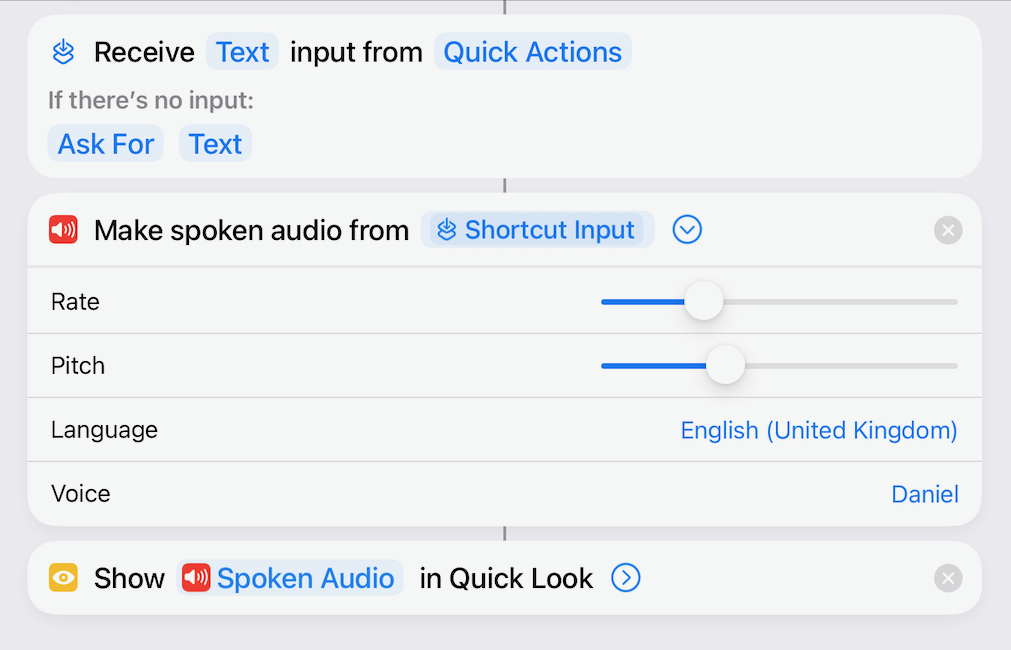
By clicking on the three-dot option access in Shortcuts, the basic commands are revealed. The second of these can be expanded to reveal controls for the voice, including name and speed.
I saved a bookmark to the app on the iPad and the iPhone, so I could run this more easily, but this did not always work on the iPad. However, after I deleted the bookmark I was able to run it in Shortcuts. I exported another bookmark and it worked perfectly. On the iPhone, I was able to run this without problem.
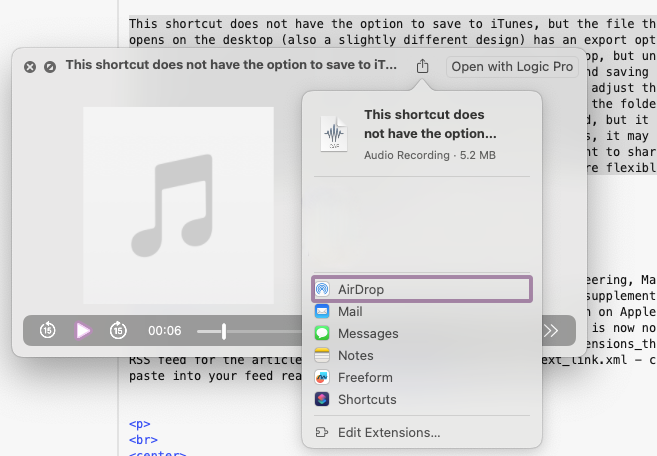
This shortcut does not have the option to save to iTunes, but the file that opens on the desktop (also a slightly different design) has an export option at the top. This allows certain apps to be used, as well as Airdrop, but unlike the iPad does not allow me to save as a file.
Using Services and saving the file to the Music folder, makes it available in iTunes. I can adjust the metadata in iTunes to show my own name as Artist. I can navigate down to the folder with my name nested in the Music folder and share that file if needed, but it is a bit fiddly. If I want to use the audio file for my own purposes, it may be easier to use the Services option on the Mac. However, if I want to share the file with others, using the shortcut on the iPad (or iPhone) is a little more flexible than the shortcut on the Mac.
Graham K. Rogers teaches at the Faculty of Engineering, Mahidol University in Thailand. He wrote in the Bangkok Post, Database supplement on IT subjects. For the last seven years of Database he wrote a column on Apple and Macs. After 3 years writing a column in the Life supplement, he is now no longer associated with the Bangkok Post. He can be followed on X (@extensions_th). The RSS feed for the articles is http://www.extensions.in.th/ext_link.xml - copy and paste into your feed reader.

For further information, e-mail to
Back to
eXtensions
Back to
Home Page