|
|
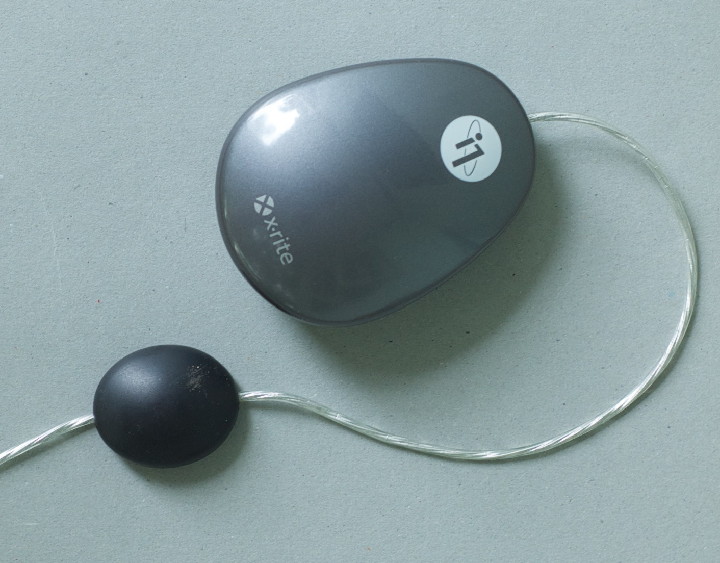
A few months ago I interviewed Danai Chutinaton at Blue Pano whose nice panorama images are used by several local companies for promotion purposes. He recently got in touch and sent me links to panoramas of the Siam area. He told me he had taken delivery of a new 44" Epson printer which was installed in his new office near Samitivej Hospital. A few days later I called in, just in time to see a print job being wrapped up. When talking about producing high-grade images, he showed me a number of test prints and explained his ideas about colour quality, enlightening me about the morning light having blue tones and the light in the evening yellow. As part of this explanation he gave me a quick lesson on calibration, allowing me to compare printed samples against a card he had that showed true black. He later offered me the chance to try one of the X-Rite devices he is agent for. Danai used the example of a car from the factory: there is nothing wrong with the engine (in the computer's case, the hardware), but the car may require tuning for the fuel, its use and the terrain. The computer monitor is fine as installed, but to get the best performance, calibration may be needed.
The disk provided had two folders, marked PC and Mac. The Mac installation was a simple package and after entering passwords took about a minute to install on my 2.66Ghz MacBook Pro. The application is in a folder with several sub-folders, log files and other related files. To avoid the clutter, I dragged the application icon to the Dock. There was an update (v 3.6.3) for the Mac software to support OS X 10.6 and I downloaded that, but it was not a tidy install using older installation software, and it put a second application alongside the first. I simply ignored that.
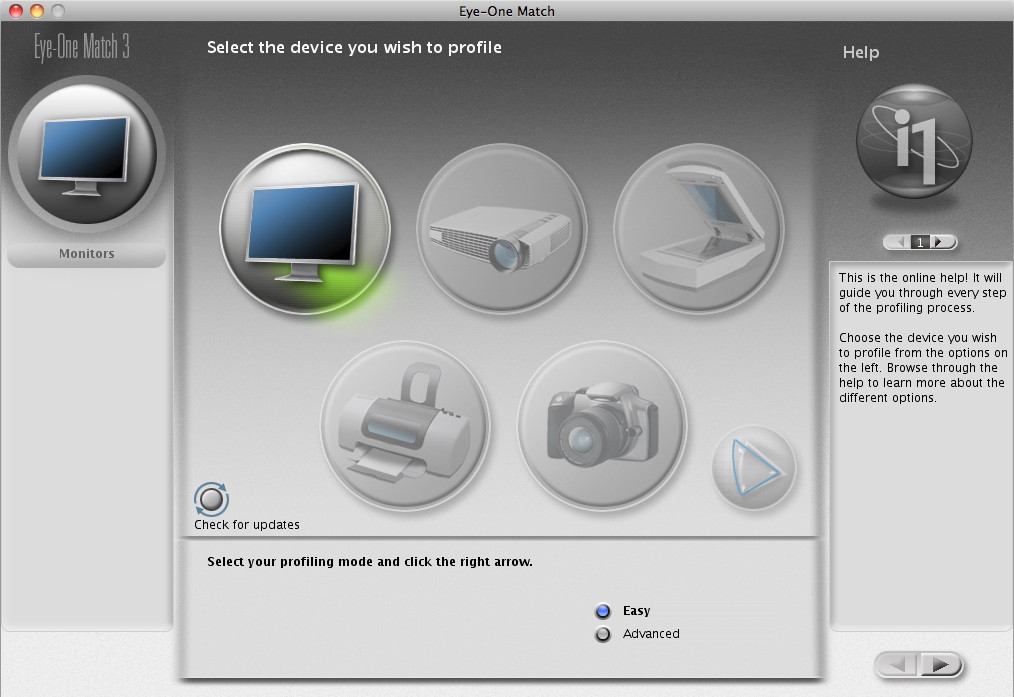
When I attached the device the software recognised this as a screen calibration. I clicked on the screen icon and was offered two options: Easy and Advanced. Each step offers an easy to understand text. We advance to the next step by clicking on an arrow. We may also go back using another arrow. I selected the Laptop option (others are LCD and CRT) and placed the device on the monitor. The weight hangs over the back of the screen to ensure stability. I started the calibration process and the display went through a couple of white, then grey screens, and then a series of coloured panels: red, green, blue, black, followed by other colours with some subtle variations. A small progress bar was displayed top right of the screen.

The Easy calibration was complete in under five minutes and a new profile was saved. If I had access to the device all of the time, I would be reminded at intervals (the default was weekly) and could recalibrate each time. Before finishing the process, there are buttons that allow a user to compare the before and after state of the monitor output: using this I was able to see a clear difference in the display. My untrained eyes would never have been able to see the lack of vibrancy in images, for example. The new profile is saved in the Displays preferences of System Preferences and a panel in Eye-One indicates the name of the profile, also telling the user the software will quit as the job has been done. There is no limit on the number of devices you may calibrate.
|
|