|
|
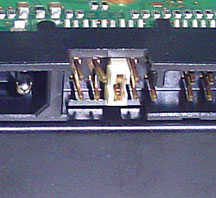
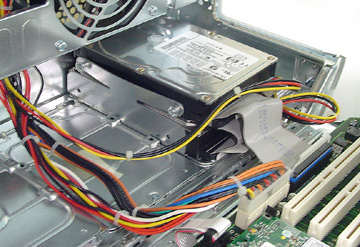
Second hard disk: note the position of the jumpers
eXtensions
|
Adding a Hard Disk: Ease and Pitfalls |
Not long after acquiring my first Mac (a used Quadra), I had to replace the battery. I was surprised at how easy it was. A Mac user whom I knew at the time was worrying about dust and dirt on the inside and I suggested that he open it up and have a look. The look on his face was a mixture of alarm and dread. Mac users never open their machines, of course.
While it is not too easy to get into the iMac or a Power Book, the G4 and G5 are designed with ease of access, and expandability, in mind.
|
|
|
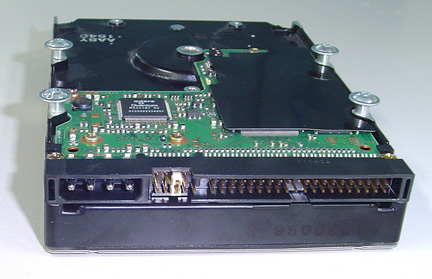
It fell to me to put a second hard disk into one of the office G4 PowerPCs. I was reasonably confident of the software part of the installation, but first I had to arrange for a reluctant technician to help with the physical installation: the hardware itself. Fortunately, Apple has much online help and I downloaded a .pdf file that gave me more information than I will ever want to know about the insides of the computer. Armed with this, I shut down, pulled the power cable from the rear, opened the case and pointed at the hard disk. (N.B. Before installation, the Apple document -- PowerMacG4SU.pdf -- recommends that the jumpers on the second disk be changed for "cable select" mode.)
The cable that is attached to the hard drive is the same as those found in any PC -- a standard. Once the technician had seen this, his confidence bloomed. Removal of both the data connector and the power source cable needed a bit of force (this is where I would have wilted) but the disk was out onto the desk in seconds.
|

|
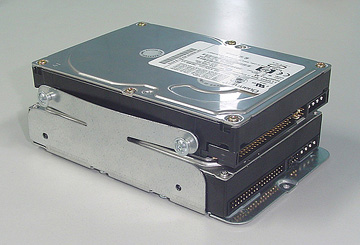
A second hard disk can be placed on top of the first in the mounting. As the new disk is secured, the sides of the fixture bend in slightly -- apparently by design. The disks were returned to the case and secured with the one screw. The connector was replaced and a second connector, about 5 cms along the cable, was fixed to the new disk. The technician then put the power connectors in place and we were ready to restart. A relieved young man left the room, happy that his role was complete.
|
|
The problem with the software part of a new installation, is that it is so easy it is possible to make mistakes. Care, preparation and an unrushed approach all help.
The new disk needs to be initialised (and partitioned) to run in a Mac. This is like formatting in a PC. Easy enough to do, but easy to get wrong. The new disk can be initialised either from disk on which the operating system is running; or using the install CDROMs. These disks may be better if you need to install the operating system on the new disk: but this carries other risks.
In both cases, the application used is the Disk Utility. If the new disk has nothing on it, it will first need to be mounted. This function is available in the File menu (or by using the "mount" icon in the toolbar. At this stage, if using the CDROM to make changes, it may be wise to unmount the normal system disk. This is possible as the CDROM is the current system disk. If you select the wrong disk, you could delete your entire system.
If you are using the normal boot disk to initialise, it cannot be unmounted; but nor can you erase or partition that boot disk. Although you cannot install a system on the new disk, you cannot delete the current system disk in this way. You can using the CDROM.
In the Disk Utility, each disk displays an icon of the disk itself and (below) an icon for each partition. Select the disk icon and you have access to a set of tools: First Aid, Erase, Partition, RAID and Restore. Select the partition icon and there are three tools only: First Aid, Erase and Restore. (I used Erase recently on one of those little thumb drives, as this is a way to give it a name, instead of having it appear as "No_Name").
With the new disk mounted, the first task I did was to erase and select the MacOS Extended disk format. This procedure requires that the disk be given a name, and it is here that particular care should be taken. Computers work logically and the letters of the alphabet are part of that logic. If you give the new disk a name that is before that of the system disk, the order in which they are listed will change. Click on the wrong disk while partitioning and you could say goodbye to your data.
As in Windows and Linux systems, there are several ways to partition a disk. It is possible to select one or several partitions, and while partitioning different disk formats may be chosen. When the size, type and name have been entered, click the Partition button. If you decide that you selected wrongly, there is a "Revert" button, but this will not work once the system has been restarted.
With the disk partitioned, it is then ready to have the system itself installed, and this can only be done by inserting the install CDROM and restarting.
For the sake of safety, I would erase and partition a new disk working from the system disk and then switch to the install disks to put on a new system.
Among many ideas making a return to OSX is the desktop printer, last seen in System 9. This is an icon of the printer on the desktop: to print, drag a file over the icon and release. It prints without the need to open the application the file was created in. An extra wrinkle to this is the ability to drag the icon to the toolbar of the Finder. You have to hold it there for a second or two before the other tools wake up and make room; but then it is available in every Finder window.
Some users in Phuket are trying to get together and create a Mac Users group for the area. Anyone interested is invited to contact Sam Erik Ruttmann of the Dusit-Laguna at dlpgm@dusit.com
For further information, e-mail to Graham K. Rogers.
Back to
eXtensions
Back to homepage