Cassandra - Tuesday Diversion: Mismatched Photo Editing tools and Controls on Macs and iOS
By Graham K. Rogers
Photos on the Mac has a fair range of tools for basic editing, but on iOS and iPadOS the interface is different as the tools do not match. Oddly, some useful tools available on iPhones and iPads are not available on the Mac as if the teams that designed these apps did not cooperate with each other, and ignored the users.
I took a number of photographs at a workshop for engineering students I attended recently, but I was not so happy with the washed-out appearance of the images, This was almost certainly due to white balance. It is not too hard to fix this even in Apple's Photos on the Mac although the DSLR has its own separate options for different types of light.
I find that Auto settings for white balance on the Nikon work reasonably well in most situations, especially following a firmware update last year. It is just that the artificial light used in the clinical surroundings of the lab were a little too much for the camera to cope with. I changed a few to Black & White as a way of compensating, but some consider that is cheating.
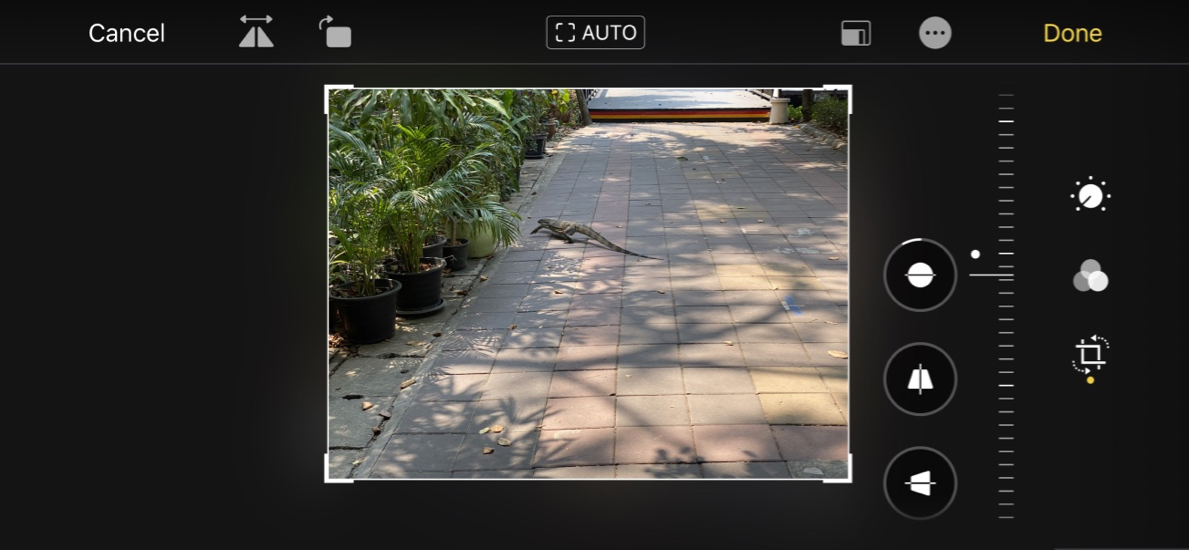
On the iPad Pro and the iPhone, with iOS 13 there are now two controls that help with the white balance: Warmth, and (just below with a water-drop icon) Tint. Both use the familiar scrolling interface at the right side of the screen. Apple presumes that all users are right-handed. Aperture on the Mac could have right or left-handed controls; while on the iPad, Pixelmator Photo, allows controls to be used either side. With Warmth, moving the finger downwards adds a yellowish-red appearance (warmer), while sliding upwards makes the image look more blue (cool). The slider runs from 0-100 in either direction.
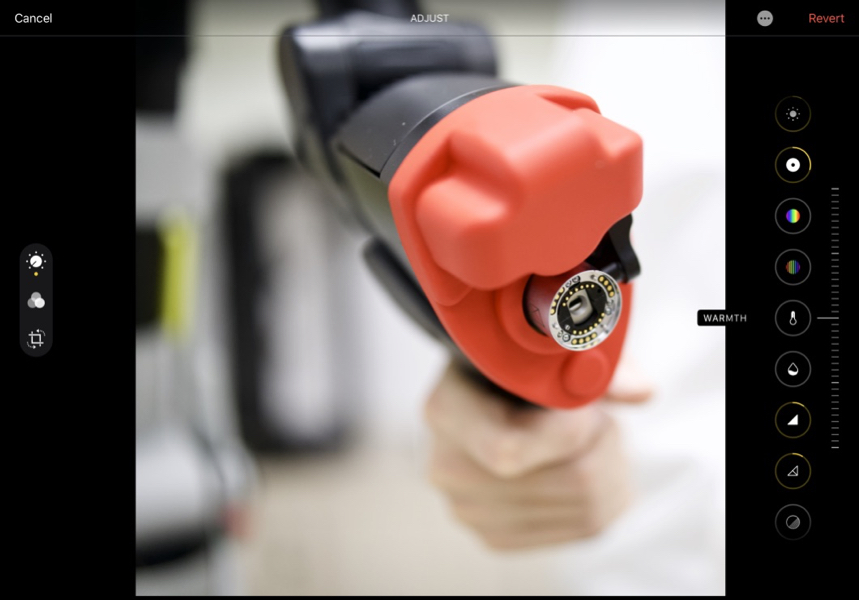
Warmth tool - here on iPadOS
Apple made a lot of noise about the addition of these features (as well as sharpen - long overdue) but the execution is not as good as I had expected. It certainly works, but the overall changes to Photos editing make the process less intuitive when the sliders used in previous versions were so easy to operate. I must admit (and I have written elsewhere) I am not a fan of the editing interface in Photos on iOS 13.
On the Mac, the adjustment panel is in a similar style to how the controls were provided in iOS 12 and before. There is now a complete mismatch between the two platforms and I find this annoying. Photos on the Mac has the same interface in Mojave and Catalina. Apple had added tools before, but changing the interface for iOS (and iPadOS) only adds confusion. Many see this as unnecessary tweaking: if it an't broke, don't fix it. Those who have updated to Catalina are permitted a roll of the eyes here.
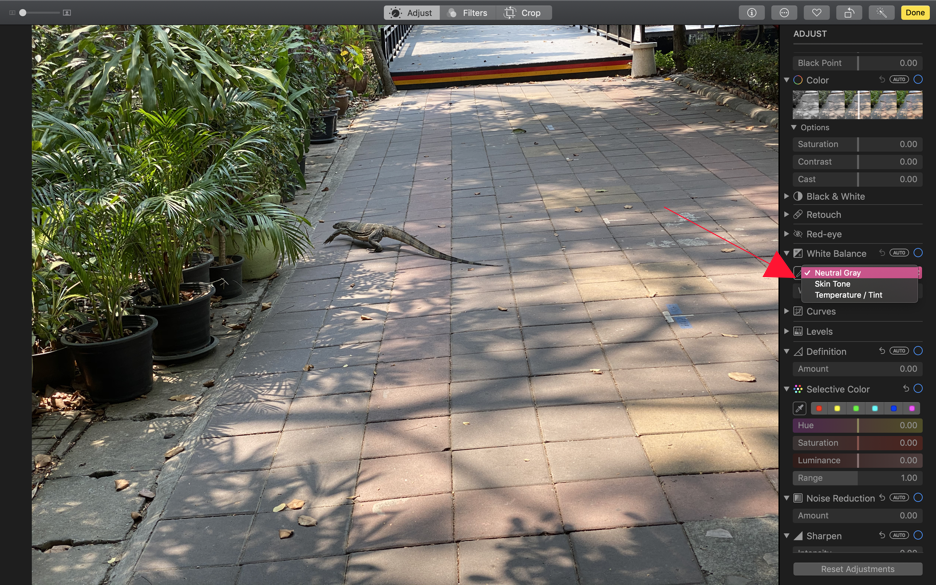
I am fairly happy with Photos editing on the Mac, although there is room for improvement: more tools, more metadata, and better location adjustment. The interface is similar to how Photos on iOS was before iOS 13. The main adjustment tools (and their controls) are reasonably intuitive: in my opinion, now less so on iOS. Below the three main sections of the editing panel, Light, Color and Black & White (this is sadly missed on iOS), are a number of other controls, including Retouch and White Balance. Among the other tools available is the welcome Selective Color which I had used often in Aperture.
There are three adjustment options for White Balance: Neutral Gray, Skin Tone and Temperature/Tint. I tend to use the default, Neutral Gray, and place the dropper icon over a gray area in an image, then click. The software is usually good enough to fix most images with just this single action, although I may sometimes move the slider (Warmth: Warm - Cool) a little until I am satisfied.
The Skin Tone adjustment also has a Dropper icon, but I am not really happy with the results, finding the adjusted image a little warm, both with Caucasian and Asian faces. If I use this, I am sure also to need an additional adjustment using the Warmth slider
Temperature and Tint provides two sliders. The first, which seems to be marked as Kelvin, runs from 2500 (cool) to about 10,000, with the center mark at 6240. I say "about," as the slider obscures the figure if it is run all the way to full Warm. The Tint slider runs from Green to Mauve. Any slider input needs to be judicious. Whatever I am adjusting (from Exposure to Grain) I often use a setting of half my original input idea: less is more.
I take a lot of photographs and trash lots too. It is rare that an image does not need some adjustment, with exposure, brightness, contrast and sharpen at the top of my list. White Balance is on my list too and I am sad to see on social networking sites so many images that could be easily improved by the use of this and the other basic adjustments, particularly the many images taken in poor lighting conditions. It may also be useful for Saturation to be adjusted too.
There are other significant mismatches to the tool sets between the Mac and iOS (iPadOS). Of course, strong tools like Selective Color are not available on the iOS app, although I have apps like Darkroom, Pixelmator Photo (iPad only) and more that provide these. For me, there is a serious omission within the Crop tool set on the Mac. Both platforms have Straighten and Rotate, which are valuable, but while the Mac has horizontal Flip (Flip vertically when the Option key is used), the iPhone only has a horizontal flip option. This is the same for the iPad Pro, even with a keyboard attached.
Straighten, Perspective and Keystone on the iPhone
However, the iPad and iPhone trump the Mac here as there are additional adjusters for Perspective and Keystone, the former being especially useful with output from the smaller lenses of iOS devices (and even with wide angle lenses on DSLR). These should also be in Photos on the Mac.
While working through the tools and features on the different platforms - Mac, iOS and iPadOS - I made a small discovery with the iPad. I am familiar with a wide range of keystrokes which I like to use as they are more efficient. With the iPad I discovered that the Shift + Command + 3 key combination would take a full screenshot as on the Mac. If I used Shift + Command + 4, this brought up a window with markup tools that allowed me to select the specific part of the screen I wanted to save as an image and crop to the right size. I was also able to do this with the iPhone 11 Pro when I connected a Bluetooth keyboard to this device.
Selection of screen shot on iPad using Command + Shift + 4
I mentioned a few days ago about a couple of sites that were reducing activities, one because of ill health, the other (MacSurfer) as the management were approaching retirement. Still running is MacRumors and an article this week by Eric Slivka reports that it has now been in existence for 20 years. My own site has been online since 2002, starting with 3 book reviews (including David Pogue's Mac OS X: The Missing Manual) although I had been writing a bit before that for the Bangkok Post when it was a real newspaper. I think I might write that first article differently if I were to do it again.
Many were not happy when the long-existing startup sound disappeared from new Macs and we were faced with silence. It was not only soothing, but when carrying out maintenance, or installing updates, it was a signal that something was happening rather than that wait in darkness we now face.
There was some information online a couple of years ago about how to restore this, but although I typed in the command, it did not work for me (or several others) and appeared to be a false trail. In the last week I have seen a number of online comments about a new discovery to reinstate this sound using
sudo nvram StartupMute=%00
Removing it would be done with that 00 changed to 01 (binary, obviously - yes/no, black/white, true/false, on/off). Remember also that (because of the use of sudo) this has to be done from Terminal in the Admin account. If you are like me and work 99.9% in a User account it will not work. I tried this on the Mac mini in my office and it does indeed now chime.
Graham K. Rogers teaches at the Faculty of Engineering, Mahidol University in Thailand. He wrote in the Bangkok Post, Database supplement on IT subjects. For the last seven years of Database he wrote a column on Apple and Macs. After 3 years writing a column in the Life supplement, he is now no longer associated with the Bangkok Post. He can be followed on Twitter (@extensions_th)
|

