|
By Graham K. Rogers

I have been using the free version of PhotoEffects Lite on my Mac for a couple of years. This is an application that allows a user to add filters to an image quite quickly. The free version has around 70 filters. Like any such application, the value of the application is in how the user makes the most of the available filters, and the difference in those filters, from application to application.
On iOS for example, there are a number of apps that are head and shoulders above others when it comes to filters, for example the AutoDesk app, Pixlr-o-Matic, and Distressed FX from Cheryl Tarrant.
I find a couple of the effects in PhotoEffects Lite are particularly attractive, so have kept this on the hard disk, even though I do not use it often. I have a number of applications like that on the Mac and the iPhone. When I was scanning through the new arrivals earlier in the week, I noticed Effects Studio, by Claude Bezeaud. The screen shots in the iTunes App Store immediately put me in mind of PhotoEffects Lite. I downloaded this $0.99 app for a better look.
Effects Studio
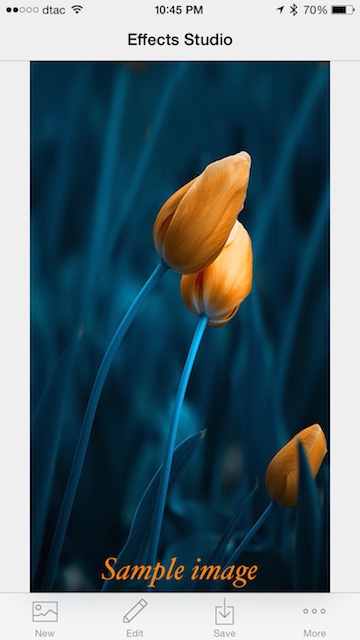
There are no real surprises when the app opens with an attractive "sample image." Below this main screen are four icons, marked: New, Edit, Save and More, which includes instructions on how to use the app as well as other information and links (Twitter and feedback).
- New opens a small panel with the usual options of Camera or Photo Library. Selecting an image loaded that into a working page with 5 controls available at the bottom: Filters, Effects, Blend, Blur & Focus, Adjustments (and several more).
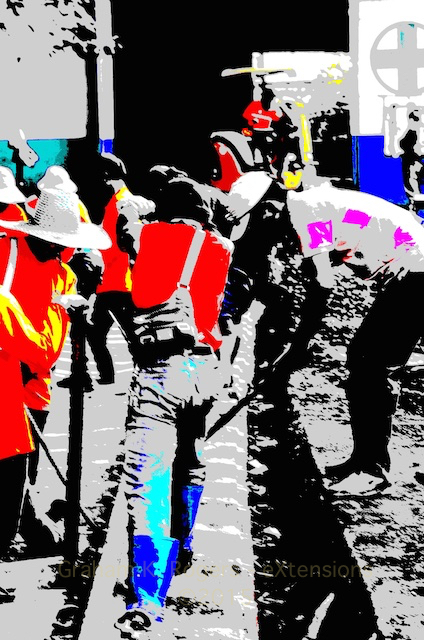
- Filters gave me just under 50 options, each of which appeared as a tiny image (too small to call these thumbnail images) at the bottom of the screen. Selecting any one applied the effect immediately. Changing the filter was also instant. As with any set of filters, a user will prefer some over others. The effect was applied by pressing OK at the top of the screen. Back returned me to the editing screen.
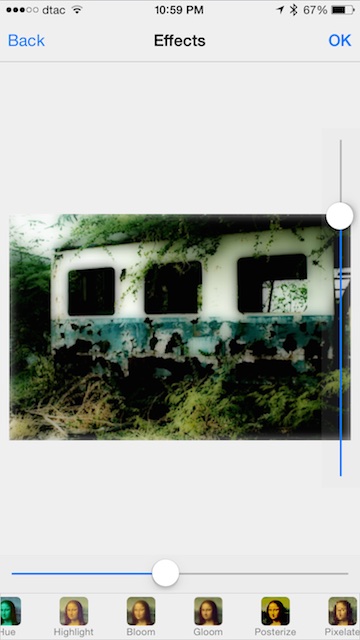
- Effects were shown by mini-Mona Lisa images at the bottom of the screen, with None plus 11 others. One or two such as the one marked Hole (a sort of fish-eye effect) were extreme. Some of the effects had sliders to adjust the effect. A couple had two sliders. I rather liked the effect marked, Spot (a heavy vignette) and Gloom, which had caught my eye in the iTunes store.
- Blend displayed over 100 effects which could be added as a layer over the image being worked on. These, more than the filters and Effects, would be a personal choice. Each however had three sliders: strength, brightness and contrast. I rarely find that I am excited by this type of effect, although some were intriguing enough.
- Blur & Focus had two functions: a straightforward image blur that was applied by selecting a square icon marked, Normal; and a Tilt-Shift effect applied by selecting either a circle or parallel lines. The circle and lines could be moved across the image so that the right area for focus could be chosen, while the strength of the blurring for all three options is controlled by a slider.
- Adjustments displayed three slider controls: Saturation at the bottom, Contrast (right) and Brightness (left). These were quick and easy to use: I was able to fine-tune the image in a couple of seconds.

What was not immediately evident until I looked at the app on the iPad was that, to the right of Adjustments on the iPhone, are several other editing options:
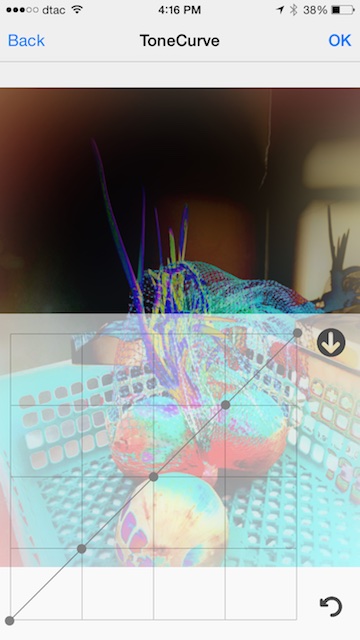
- Tone Curve is a sophisticated tool allowing those with experience (I don't) to adjust certain aspects of a picture
- Rotate has three options: a 90, 180, 270 and 360 degree rotation; as well as mirroring vertically; and mirroring horizontally
- Resize allows a user to enter a new size for the image: this may either be locked (change of horizontal, changes vertical in proportion) or unlocked. A number of resolution presets are also shown
- Crop has sliders to enable easy cropping of an image, aided by grid lines. Presets are also available here (e.g. 1:1, 4:3 and more)
- Text could be added to the image with a good selection of fonts, including versions of the Thai font Thonburi. Colors could be changed and there were options for alignment
- Draw provided two simple sliders: for tool width and color
- Splash displayed the image in monochrome and dragging the finger over the picture would return the original color. The width of the splash tool was adjustable with a slider.
- Emoticons are available. . . .
- Masks are also available: horror faces that may be placed over the image.
- Frames are available for those who appreciate these.
- Wigs include moustaches, beards, hair-pieces and other additions for those who feel that they cannot live without these.
- Edit displayed the same controls as are available when an image is first brought in, as detailed in New, above. I found this useful when I wanted to re-edit an image that I had already worked on.
- Save brings up a typical export panel with options for Message, Mail, Twitter, Facebook, Flickr, iCloud Photo Sharing and More (Replay, Viber and Linkedin were listed). Users may also Save Image (Photo Library), Copy, or Print. More shows the same items, plus two features that I needed to turn on: Investigate, and Run Workflow. These last two then appeared as options in the Save panel:
- Investigate showed a panel in which was shown, View Advanced Metadata. Unfortunately the panel was blank, and pressing the text area at the bottom made no difference. I tried with a number of images - edited in the app, from the camera, fresh from the Photo Library - but no metadata was shown.
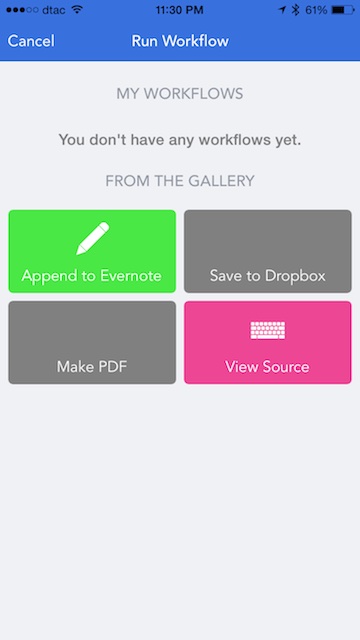
- Run Workflow is used to link to another App (Workflow) - which I had downloaded, but not examined - and was a little more succesful. A panel appeared with a number of options: Append to Evernote, Save to DropBox, Make PDF, and View Source. I used the last and was prompted to Save the Workflow. This is like Automator for iOS and will need more investigation.
Exporting
Image output size was respectable, but not exceptional at 2318 x 1536 (3.6 MP) with a file size of 524 KB for an image that was originally taken with DSLR and optimised for the Photo Library. An iPhone camera image was 1534 x 1150 (1.8 MP) but with the file size a little larger at 941 KB. The original was 3068 x 2301 (7.1 MP) with a file size of 3.26 MB.
An image taken in the app using the iPhone camera was 2448 x 3264 (8.0 MP) with a file size of 1.04 MB. This image was only saved in its edited form which had no camera metadata, unlike images taken with the iPhone normally. None of the other images preserved metadata, although the original images were unchanged (and the metadata was available).
Using the Mail option to send an image created from a photograph, I was offered several sizes from Small (34.3 KB) to Actual Size (1.3 MB). I saved the same image to the Photo Library on the iPhone: 3264 x 2448 (8.0 MP), file size 1.30 MB, so differences are minimal here.
As with a lot of such apps, I was disappointed with the output size of images. The iPhone camera is able to take quite large photographs: output needs to keep pace with this, unless we are only going to post images to social networking sites. We can do better than that.

Comments
I did most of the examination of Effects Studio on the iPhone, but as it is a Universal app, it does display full screen on the iPad where it is even easier to work with. Output of an image from the Nikon that was in the Photo Library of the iPad was slightly smaller (2464 x 1632, 4.0 MP, 302 KB) than another DSLR image edited on the iPhone.
Although there is a wide range of editing tools, some of those available may not suit all users. In my case, several of the options will remain unused from now. However, the options like emoticons and wigs, clearly have a market.
The additional features, especially the integration with the Workflow app, were not what I expected. I would have liked time to become familiar with that app, before leaping into it from Effects Studio. And when I agreed to link to DropBox, it was Workflow that linked, not Effects Studio. That makes sense when thinking about it afterwards, but this was not clear while it was happening.
As an image editing app, Effects Studio has quite a lot going for it. Some of the effects and filters available are unusual, while the extra image manipulation provided by the Blur and other simple editing tools, makes this a good alternative for many users interested in special output of images and is recommended.
Graham K. Rogers teaches at the Faculty of Engineering, Mahidol University in Thailand where he is also Assistant Dean. He wrote in the Bangkok Post, Database supplement on IT subjects. For the last seven years of Database he wrote a column on Apple and Macs. He is now continuing that in the Bangkok Post supplement, Life.
|
|